Labels

APPLE (1) IDL (4) LSD (2) Mac (2) astro (1) life (2) linux (5) teaching (1) volleyball (2) work (1)

Saturday, February 14, 2015

How to build the newest version of Git for Windows?

The previous post talked about how to make makefile work on Git Bash for Windows. This Git Bash comes with the current downloadable executable from the official Git website. At the time of writing, the Git and Msysgit version from this downloadable executable is both on version 1.9.5.

I checked out the official Git website again the other day and found out that the newest Git version is 2.3.0. As someone who always want to be experiencing the newest technologies, I, of course would like to install this newest version on my computer. Just kidding. In fact I went back to the website because the Git Bash at the time was having problems handling unicodes when running PostgresQL and IPython from the command line. It messes up the command line structure and I had to run "clear" to take it back to normal. However I can't do it when I am inside IPython. Therefore, I was looking for a newer version of Git Bash that handles unicode well.

The newest version Git (along with Git Bash) is supposed to be able to do the job. The source code is right there on github, but I did not have any knowledge about building Git from source. After some digging on the internet, I went back to the origin, the same repo on the source code, knowing that I can build the newest version of Git for Windows from msysgit. Here is a step by step tutorial on how to build the newest version of Git for Windows.

This tutorial benefits mostly from the wiki of the Github repo.
1. Download netinstaller for msysgit;
2. Click on the installer and select a directory (I used the default: "C:\msysgit\") and let it run.
That's it.

You might wonder why the hell do I need this tutorial then since this is so straightforward. The reason is that actually you might encounter failure as I did.
The error messages I got is:

Generating catalog po/bg.msg
msgfmt --statistics --tcl po/bg.po -l bg -d po/w 304 .
make[1]: *** [po/bg.msg] Error 1
make: *** [all] Error 2

-------------------------

Hello, dear Git developer.

This is a minimal MSYS environment to work on Git.

Your build failed... Please fix it, and give feedback on the Gitlist.

Welcome to msysGit
Run 'git help git' to display the help index.

Run 'git help ' to display help for specific commands.
Run '/share/msysGit/add-shortcut.tcl' to add a shortcut to msys
Git.bash: /git/contrib/completion/git-completion.bash: 
No such file ordirectorybash: __git_ps1: command not found


If you unfortunately encountered this problem, the trick is as follows:
(useful link: https://groups.google.com/forum/#!msg/msysgit/TNXXQ21mfrg/IGkW5ZNoLYgJ )
1. exit msysgit by typing "exit" after the failure;
2. find the file  /share/msysgit/net/setup-msysgit.sh, open it in a text editor and add the following line to the beginning of the file:
export LANG='C';
3. click on msys.bat in the C:\msysgit\ folder and it opens a command line window;
4. type in cd git in the command line;
5. type in make clear in the command line;
6. type in make install in the command line.

Now you should be good to go. 


Thursday, January 22, 2015

How to Set Up Makefile in Windows Git Bash

This is my first time using standalone git in Windows. Earlier I've installed and used Github for Windows which git comes along with. I am amazed by the available ?nix functions in this little git bash shell. Today I wanted to use the makefile function but found that it is not there. Therefore, I did some digging.

Here are some of the helpful resources I have found: http://stackoverflow.com/questions/17158419/how-to-run-makefile-in-windows
http://lists.gnu.org/archive/html/help-make/2011-09/msg00041.html

My system is Windows 8.1 64 bit, and here are the steps I did:
1. Install msysgit downloaded from http://git-scm.com/download/win
2. Create a directory in the git install direcctory: C:\Program Files (x86)\Git\mingw\bin, naming it mingw
3. Install mingw-w64 downloaded from http://sourceforge.net/projects/mingw-w64/files/Toolchains%20targetting%20Win32/Personal%20Builds/mingw-builds/installer/mingw-w64-install.exe/download
4. Go to the bin folder in the mingw-w64 install directory. In my case it is C:\Program Files\mingw-w64\x86_64-4.9.2-posix-seh-rt_v3-rev1\mingw64\bin
5. Rename mingw32-make.exe to make.exe
6. Make a Symlink redirect to this folder from the msysgit install directory by running this command in Command Prompt (run as Administrator):
mklink /j "C:\Program Files (x86)\Git\mingw\bin" "C:\Program Files\mingw-w64\x86_64-4.9.2-posix-seh-rt_v3-rev1\mingw64\bin"

Now you should be able to run make in your git bash console.


Wednesday, December 31, 2014

Dedicated to Sweaty Feet and Smelly Shoes

On my defense I don't have a collection of shoes to begin with, so I usually wear the pair of shoes for quite some time until they are worn out or unacceptably stinky. The shoes I wear for volleyball are worse. I sweat a lot just by walking. You can imagine how would that be after three-hour running and jumping from volleyball. I would like to know very much how I can keep my pair of shoes from smelling too bad but still be able to wear pretty much everyday. I have done a few research and found this post on Yahoo answers.

I'll copy paste here in case the url expires for some reason.

The Original Post:

Saturday, December 13, 2014

Lenovo Y50 with Windows 8.1

I have recently purchased this new computer and would like to start up a journal to record the changes I have made since day 0.
Dec 11:
 Got the computer from UPS in the morning
 Started the initial setup but stuck after everything was ready, did a hard reboot and everything seemed to be working OK
 Installed Google Chrome, Daemon Tool Lite 4
 Originally wanted to install Ubuntu alongside Windows but this is too complicated and video card might not work properly so decided to install Ubuntu using Virtual Machine.
Dec 12:
 Debated on which Virtual Machine to use, VM Ware or Virtual Box and settled on Virtual Box since it's free and tend to use less source from the hosting OS.
 Installed Virtual Box
 Downloaded Ubuntu 14.04 64 bit
 Downloaded IDL 8.4 which I use for my graduate research
 Uninstalled McAfee, Nitro Pro and more since they are not free and I can find free alternatives  Installed Avast Free AntiVirus
 Set up the Virtual Machine for Ubuntu 14.04 using fixed size 300 Gigabytes which takes around 2 hours and disk 0 activity at almost 100% which might not be a good idea but I will use Ubuntu as my main working system
Dec 13:
 Installed Ubuntu using the allocated 300 Gigabytes space, 50 G for root \, 16 G as swap disk, and the rest for \home.
 Installed IDL 8.4
 Installed Sogou Pinyin Input
 Installed MikTeX
 Installed BaiduYunpan
Dec 14-18:
 Installed GSView, GVim, CubicExplorer, Mendeley Desktop, SumatraPDF, Microsoft Office 2013, MPC, SSH Client, Winrar, Xming

Friday, December 10, 2010

volleyball diary

Dec-10-2010:

Setting: Set the separation of your hands the size of the ball

Thursday, December 2, 2010

Useful Linux Commands

1. tar - tape archive and gzip - gnu zip

Creating a tape archive:

tar -cf archive.tar myDirectory/

Note - using the "v" flag prints out extra messages, as verbose mode, though it's not related to extracting files.

Listing the contents of an archive:

tar -tf archive.tar

It is generally a good idea to preview the contents of tape archives before unpacking them. This can become a serious problem if you are currently root, and the archive just happens to jump out of the current directory, and write over some important system files.

Extracting all files from an archive:

tar -xf archive.tar

To extract just partial pieces from the archive, supply a file or directory name after the archive name. You can list as many as desired here, separated by spaces.

tar -xf archive.tar filename


This is a gnu utility that is used to compress/decompress a file. Generally, if there is a set of files to compress, they will be sent through tar first to create a single file.

Compress:

gzip archive.tar

Decompress:

gunzip archive.tar.gz

How to Print non-contiguous pages in Leopard's Preview

One of the handy new features in the OS X 10.5 version of Preview—I’m pretty sure this is 10.5-only, at least—is the ability to selectively print pages directly from Preview. While you can use the Print dialog in any program to print one or a range of pages, you can’t use it to print a non-contiguous selection of pages—say pages two, four and five, and nine. But using Preview, you can do just that.

Open your multi-page PDF in Preview, hold down the Command key, and click on each page you’d like to print. With more than one page selected, the File - Print menu item changes to read File - Print Selected Pages. Choose that, or just press Command-P, and you’ll print the selected pages.

This trick proves really useful when printing Web pages. When I want to print something from the Web, I always first print it to a PDF, to see how it’s going to look, because some Web sites don’t print well at all. But once you’re in Preview, there’s no access to the Print dialog; if you click the Print button, the print job starts. By using the Command-click trick, you can choose exactly which of the site’s pages you’d like to print, right from Preview.

But what if you want to print just one page from the Web site? You might think you could Command-click on that one page and select Print…but that won’t work. With just one page selected, Preview will revert to printing the entire document. If you had access to the Print dialog, this wouldn’t be a problem…but because you printed to a PDF, you don’t.

The solution? Hold down Command and click on every page except the one you want to print, then hit Command-Delete. This will delete the selected pages, leaving just the one page you want to print. Please note that if you’re doing this on a file you’ve saved, you do not want to save the changes you’ve made—if you do, the pages you deleted will be gone for good! (But really, in the case of a saved document, you should just use the Print dialog to specify the one page you want to print.)

So the next time you need to print a non-contiguous range of pages—or just one page from a Web site—in Preview, use the Command key to get the (print) job done.

Sources:http://www.macworld.com/article/137760/2008/12/printsomepages.html by Rob Griffiths

Tuesday, July 20, 2010

How To Config the Default Settings for VI editor

1. create a file named .exrc in your home directory
2. config your settings in this file
And you are good to go

Monday, July 19, 2010

Procedures and Functions

1. fitexy:
Syntax - fitexy, x, y, A, B, X_SIG=sigx, Y_SIG=sigy, [sigma_A_B, chi_sq, q, TOLERANCE = ]

Multiple Plots on a Page


Source from: http://www.physics.nyu.edu/grierlab/idl_html_help/plotting11.html

Plots can be ganged on the display or page in the horizontal and/or vertical directions using the system variable field !P.MULTI. IDL sets the plot window to produce the given number of plots on each page and moves the window to a new sector at the beginning of each plot. If the page is full, it is first erased. If more than two rows or columns of plots are produced, IDL decreases the character size by a factor of 2.

!P.MULTI controls the output of multiple plots. Set !P.MULTI equal to an integer vector in which:

  • The first element of the vector contains the number of empty sectors remaining on the page. The display is erased if this field is zero when a new plot is begun.
  • The second element of the vector contains the number of plots per page in the horizontal direction.
  • The third element contains the number of plots per page in the vertical direction.
  • The fourth element contains the number of plots stacked in the Z dimension.
  • The fifth element controls the order in which plots are drawn. Set the fifth element equal to zero to make plots from left to right (column major), and top to bottom. Set the fifth element equal to one to make plots from top to bottom, left to right (row major).

Omitting any of the five elements from the vector is the same as setting that element equal to zero.

For example, to set up IDL to stack two plots vertically on each page, use the following statement:

  !P.MULTI = [0, 1, 2]  

Note that the first element, !P.MULTI (0), is set to zero to cause the next plot to begin a new page. To make four plots per page with two columns and two rows, use the following statement:

  !P.MULTI = [0, 2, 2]  

To reset to the default of one plot per page, set the value of !P.MULTI to 0, as shown in the following statement:

  !P.MULTI = 0 

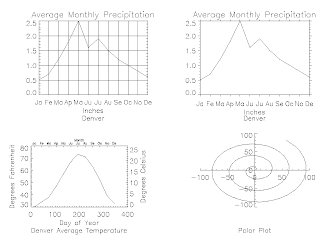
This figure shows four plots in a single window. For details, inspect the batch file plot09 in the examples/doc subdirectory of the IDL distribution. Note the following features of the plots in the figure:

  1. The plot in the upper left has grid-style tick marks. This is accomplished by setting the TICKLEN keyword equal to 1.0
  2. The plot in the upper right has outward-facing tick marks. This is accomplished by setting the TICKLEN keyword to a negative value.
  3. The plot in the lower left corner has different axes on left and right, top and bottom. This is accomplished by drawing the top and right axes separately, using the AXIS procedure.
  4. The plot in the lower right uses no default axes at all. The centered axes are drawn with calls to the AXIS procedure.

LSD journal

DateContentBeforeAfterComments
xx/xx/2008CREATED
07/19/2010stast.prowidth mod (2*dw)width mod fix(2*dw)dw has to be integer or half integer
07/20/2010stast.prowght.proif width mod fix(2*dw) ne 0 then begin
width = width/fix(2*dw)+1)*fix(2*dw)
endif
quot = fix(width/(2*dw))
width = quot*2.*dw
width and dw are better to be float type
11/08/2010lsd.procombined all the pieces into one
11/30/2010lsd.procontain no routine to exclude the lines in the gap of two ordersyes

Wednesday, August 5, 2009

[SHELL]Setting Environment Variables

ref: https://www.ccs.uky.edu/docs/cluster/env.html

There are two styles of shells on most UNIX (and Linux) systems:

Those derived from the original bourne shell (sh) which include bash, ksh etc. and those derived from the C shell which include csh, tsch, etc. The difficulty for many beginners is that these two families of shells support different syntax for setting variables in the environment along with different control flow commands.
You can find which shell you are using by typing:

echo $SHELL at the prompt

Under sh or bash, you set an environment variable as follows:

PATH= $PATH:$HOME/bin
export PATH

The first line sets the PATH environment variable. These two commands can be combined into a single line as follows:

PATH= $PATH:$HOME/bin; export PATH

The semicolon allows multiple commands to be issued on the same command line. Normally, this command would be placed in the .profile file located in your home directory. The .profile file is read when the sh, bash, orksh shell starts. It acts as an initialization file where you can set all kinds of environment variables, change behaviors of the shells, etc. The bash shell will also read a .bshrc resource file in your home directory if it exists. This .bshrc file is for commands that only the bash shell understands. A similar .bash_profile file can also be used for bash-only startup commands. If these files don't exist in your home directory, then the system uses some system-wide files in the /etc/profile. If you set these environment variables for bash in the .profile file, then they will be inherited by any shells that you start (spawn) from this shell including c shells. The "set", "env" or "printenv" command will display all of your current environment variables. You may need to pipe this command through less or more(e.g env | less) to see all of the variables

Assuming that the did not find mpif90 when you type it at the command prompt,

[ccs@agt-login ccs]$ mpif90
bash: mpif90: command not found

You can verify the existence of the command, by executing whereis mpif90 or locate mpif90 at the command prompt,

[ccs@agt-login ccs]$ whereis mpif90
mpif90: /opt/mpich-1.2.4/bin/mpif90

Once you find the path for mpif90 you can add it to the PATH environment variable so that the shell automatically finds the command when you type it next time at the shell. This can be done by either creating .profile or.bshrc or modifying the PATH variable in the already existing .bash_profile file

Append /opt/mpich-1.2.4/bin to the end of the PATH environment variable.

PATH=$PATH:$HOME/bin:/opt/mpich-1.2.4/bin
export PATH


Now we switch to the C shell side of things. The syntax to set an enviroment variables in the csh (and tcsh) is different.

setenv PATH $PATH:$HOME/bin

The "setenv" command will display the environment variables. These commands could be placed in a .cshrc file in your home directory that is read whenever a c shell starts. The .login file is read after the .cshrc file when this is a login script.

Assuming that the did not find mpif90 when you type it at the command prompt,

[ccs@agt-login ccs]$ mpif90
bash: mpif90: command not found

You can verify the existence of the command, by executing whereis mpif90 or locate mpif90 at the command prompt,

[ccs@agt-login ccs]$ whereis mpif90
mpif90: /opt/mpich-1.2.4/bin/mpif90

Once you find the path for mpif90 you can add it to the PATH environment variable so that the shell automatically finds the command when you type it next time at the shell. This can be done by modifying the PATHvariable in the .cshrc file. (You need to create if .cshrc file doesnt exist)

Append /opt/mpich-1.2.4/bin to the end of the PATH environment variable.

setenv PATH $PATH:$HOME/bin:/opt/mpich-1.2.4/bin

Wednesday, July 22, 2009

[VI] find and replace

Find the 'txt': /txt (forward searching)
?txt (backward searching)
/\ (searching for the whole word 'txt')

Get rid of the highlighting after search:
:set nohlsearch
Enable highlighting searching:
:set hlsearch

Find the replace:
:s/word/replacement/ ( once )
:s/word/replacement/g ( all at once on a single line )
:.,.+Ns/word/replacement/g ( all at once on the current line and
the next N lines )
:%s/word/replacement/g ( all at once the whole text )
:s/word/replacement/cg ( you need confirm whether or not to
replace )
:s/word/replacement/gi ( case insensitive )
:set ic ( case insensitive )
:set noic ( case sensitive )
:%//g ( remove all tab characters )

ref: http://www.linux.ie/articles/tutorials/vi2.php

Thursday, March 19, 2009

[IDL] How to save IDL plots

1. How to save an IDL plot as a jpeg file

After you made your plot in IDL you can type the following:
IDL> im=tvrd() ; im is the matrix for the image
IDL>write_jpeg,'filename.jpeg',im ; a file named filename.jpeg is stored in the current IDL working directory

2. How to make a PostScript plot


IDL> set_plot,'ps'
IDL> device,filename='name.ps'
IDL> {set of instructions to make desired plot}
IDL> device, /close
IDL> set_plot,'x'